In a previous post, we discussed how to create a Redis cluster using Docker, which is ideal for a development environment. However, for a production environment, you need a more robust setup. In this guide, we will walk you through the steps to create a production-ready Redis cluster distributed across three virtual machines (VMs). To follow along, it’s recommended that you read the previous article on Redis clusters for some background knowledge.
Prerequisites
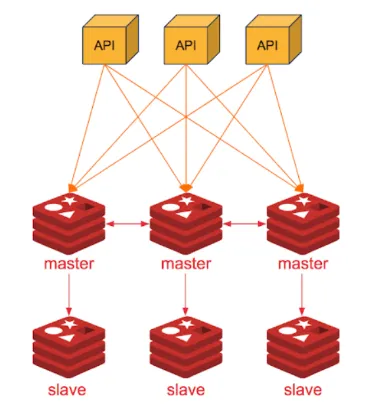
For this setup, you will need three Ubuntu VMs, and we will distribute a total of six Redis instances across them. Each VM will host two Redis cluster instances. Here’s a step-by-step guide on how to set up your production-ready Redis cluster:
Step 1: Create Folders on Each VM
On each of your VMs, create a folder called “redis_cluster.” You can do this with the following command:
mkdir redis_cluster
Step 2: Create Folders for Redis Instances
Inside each VM’s “redis_cluster” folder, create subfolders for the Redis instances. For VM 1, create folders 7000 and 7001:
mkdir redis_cluster/7000
mkdir redis_cluster/7001
Repeat this process for VM 2 and VM 3, creating folders 7002 and 7003 for VM 2, and folders 7004 and 7005 for VM 3.
Step 3: Download Redis
You need to download the latest Redis version. Use wget to download it from the official Redis website:
wget https://download.redis.io/redis-stable.tar.gz
Step 4: Compile Redis
After the download is complete, extract the downloaded Redis source code and compile it on each VM:
tar -xzvf redis-stable.tar.gz
cd redis-stable/
make
make test
Step 5: Copy Redis to Folders
Now, copy the Redis source code to the respective folders for Redis instances on each VM:
cp -r redis-stable/ redis_cluster/7000
cp -r redis-stable/ redis_cluster/7001
Repeat for VM2 and VM3.
Step 6: Create Redis Configuration Files
In each Redis instance folder (7000, 7001, 7002, etc.), create a Redis configuration file named “redis.conf” and configure it according to your needs.
#change the port number according to your folder name
port 7000
cluster-enabled yes
cluster-config-file nodes.conf
cluster-node-timeout 5000
appendonly yes
#set stonge password
requirepass "123"
masterauth "123"
protected-mode "yes"
bind 0.0.0.0
#change the logfile according to your folder name
logfile /var/log/redis_7000.log
#change the pidfile according to your folder name
pidfile /var/run/redis_7000.pid
maxmemory 256mb
Note: requirepass and Redis ACL (Access Control Lists) authentication are two different methods of securing a Redis instance. For this example we are using requirepass for authentication. ACL is a more modern and robust method of access control in Redis, introduced in Redis version 6.0.
Step 7: Start Redis Servers
Move to each Redis instance folder and start the Redis server using the following command, which daemonizes the process:
cd 7000/
sudo redis-stable/src/redis-server ./redis.conf --daemonize yes -a 123
Step 8: Verify Redis Instances
You now have six Redis instances running across three VMs. You can check their status by running the following command on each VM:
ps aux | grep redis
Step 9: Create the Redis Cluster
It’s time to create the Redis cluster. Run the following command on any of the VMs, specifying the IP and port for each Redis instance and the number of replicas
redis-cli --cluster create <vm1_ip>:7000 <vm1_ip>:7001 <vm2_ip>:7002 <vm2_ip>:7003 <vm3_ip>:7004 <vm3_ip>:7005 --cluster-replicas 1 -a 123
Step 10: Check Cluster Status
You can verify the status of your Redis cluster by running:
redis-cli --cluster check <vm1_ip>:7000 -a 123
Production Enhancements
Now that your Redis cluster is running in a production environment, it’s essential to think about additional aspects to ensure its reliability and maintainability. Here are some recommendations:
Backups: Implement a backup strategy to protect your data. You can create a shell script to periodically push Redis persistence data to a remote location.
Metrics and Monitoring: Set up a monitoring system like Prometheus and Node Exporter to collect metrics from your Redis cluster. This will help you keep an eye on the health and performance of your cluster.
Alerting: Configure alerts to be notified of any issues or anomalies in your Redis cluster. This ensures that you can take action promptly if problems arise.
Log Rotation: Utilize the default log rotation tools available on your server (e.g., Ubuntu log rotation) to manage Redis logs effectively.
Grafana Dashboard : View the Redis Cluster info By implementing these practices, you’ll make your Redis cluster even more robust and reliable. Please share your thoughts and ideas about these enhancements to further improve the robustness of your Redis cluster. In the upcoming part of your story, I will explain some important commands and how to add new nodes to your Redis cluster.
Enjoy your well-prepared Redis cluster for your production workloads!