Kubernetes, often abbreviated as K8s, is an open-source container orchestration platform designed to automate the deployment, scaling, and management of containerized applications. It was originally developed by Google and is now maintained by the Cloud Native Computing Foundation (CNCF).
Kubernetes allows you to deploy and manage containers without worrying about the underlying infrastructure. It provides a scalable and resilient platform for running distributed applications across a cluster of machines.
Key Concepts
Before diving into Kubernetes, it’s essential to understand some fundamental concepts:
-
Pods: Pods are the smallest deployable units in Kubernetes. They can contain one or more containers that share networking and storage resources.
-
Nodes: A node is a physical or virtual machine in the Kubernetes cluster. Nodes run the Kubernetes services necessary to communicate with the cluster and manage containers.
-
Deployment: A deployment defines the desired state of your application and manages the creation and scaling of Pods.
4.Service: A service provides network connectivity to a set of Pods. It enables load balancing and service discovery within the cluster.
5.Namespace: Namespaces provide a way to divide cluster resources into virtual clusters. They are useful for organizing and isolating workloads within a cluster.
Key Components
K8s is composed of several key components that work together to manage and orchestrate containerized applications. Here’s an overview of the major components:
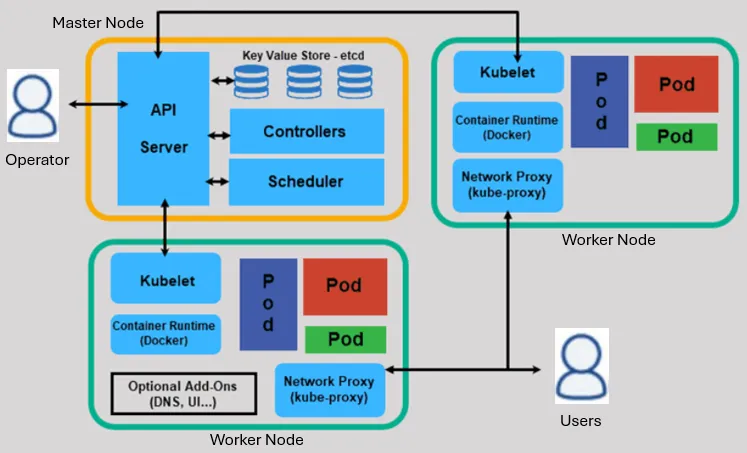
Master Components:
-
kube-apiserver: The API server is the central component of the Kubernetes control plane. It exposes the Kubernetes API, which allows users and other components to interact with the cluster. All administrative tasks and requests are handled by the API server.
-
etcd: etcd is a distributed key-value store used by Kubernetes to store configuration data, state, and metadata of the cluster. It serves as the cluster’s backing store for all persistent data.
-
kube-scheduler: The scheduler is responsible for assigning Pods to Nodes in the cluster. It evaluates resource requirements, affinity, anti-affinity, and other constraints to make intelligent decisions about where to place Pods.
-
kube-controller-manager: The controller manager runs various controllers that regulate the state of the cluster. These controllers include the Node controller, Replication controller, Endpoint controller, and others. They continuously monitor the cluster’s state and reconcile any discrepancies to ensure the desired state is maintained.
-
cloud-controller-manager (optional): If the Kubernetes cluster is running on a cloud provider such as AWS, GCP, or Azure, the cloud-controller-manager integrates with the cloud provider’s APIs to manage resources like Load Balancers, Volumes, and Routing.
Node Components:
-
kubelet: The kubelet is an agent that runs on each Node in the cluster. It is responsible for managing the Pods and containers on the Node. The kubelet communicates with the API server to receive instructions, monitor Pod status, and report back health status.
-
kube-proxy: Kube-proxy is a network proxy that runs on each Node. It maintains network rules to enable communication between Pods inside the cluster and from external clients to the Pods.
-
Container Runtime: Kubernetes supports various container runtimes such as Docker, containerd, and CRI-O. The container runtime is responsible for pulling container images from a registry, running containers, and managing their lifecycle.
These components work together to provide a robust and scalable platform for deploying, managing, and scaling containerized applications in Kubernetes clusters.
Setting Up Kubernetes
To get started with Kubernetes, you need a Kubernetes cluster. You can set up a local cluster for development and testing using tools like Minikube or kind (Kubernetes in Docker). Alternatively, you can use managed Kubernetes services provided by cloud providers such as Google Kubernetes Engine (GKE), Amazon Elastic Kubernetes Service (EKS), or Microsoft Azure Kubernetes Service (AKS).
For this tutorial, we’ll use Minikube to set up a local Kubernetes cluster.
Setting Up Minikube
-
Install Minikube by following the instructions on the official Minikube website: https://minikube.sigs.k8s.io/docs/start/.
-
Once Minikube is installed, start a local Kubernetes cluster by running the following command:
minikube start           #minikube start command
kubectl cluster-info     #verify the cluster
minikube stop            #stop the cluster
Deploying Your First Application
Now that you have a Kubernetes cluster up and running, let’s deploy a simple web application using different resources including a Pod, a Deployment, and a Service.
Namespace
A namespace in Kubernetes is a virtual cluster inside a Kubernetes cluster. It’s a way to divide cluster resources into smaller, distinct groups. Namespaces help you organize and isolate workloads, resources, and objects within a Kubernetes cluster. Here’s a breakdown of what namespaces are and how they’re used.
To create a namespace in Kubernetes, you can use the kubectl create namespace command followed by the name of the namespace you want to create.
kubectl create namespace guide
Step 1: Create a Pod
Create a YAML file named app-pod.yaml with the following content.
apiVersion: v1
kind: Pod
metadata:
  namespace: guide
  name: nginx
  labels:
    app: hello-nginx
spec:
  containers:
    - name: hello-nginx
      image: nginx:latest
      ports:
        - containerPort: 80
Let’s break down each section:
apiVersion: v1: This field specifies the Kubernetes API version used to create the Pod.
kind: Pod: This field specifies the kind of Kubernetes object being defined.
metadata: This section contains metadata about the Pod, such as its name and labels.
name: nginx: This field specifies the name of the Pod.
spec: This section defines the desired state of the Pod, including its containers and other resources.
containers: This field specifies the list of containers running within the Pod.
name: hello-nginx: This field specifies the name of the container.
image: nginx:latest: This field specifies the Docker image used to create the container.
ports: This field specifies the list of ports that the container exposes.
containerPort: 80: This field specifies the port number that the container listens on.
Apply the Pod configuration using the following command.
kubectl apply -f app-pod.yaml
Step 2: Create a Service
If you want to expose your application outside of the cluster, you can create a Service. Create a YAML file named app-service.yaml with the following content.
apiVersion: v1
kind: Service
metadata:
  namespace: guide
  name: hello-world-service
spec:
  selector:
    app: hello-nginx
  ports:
    - protocol: TCP
      port: 80
      targetPort: 80
  type: ClusterIP
Let’s break down each section:
apiVersion: v1: Similar to the previous example, this field specifies the Kubernetes API version used to create the Service.
kind: Service: This field specifies the kind of Kubernetes object being defined.
metadata: This section contains metadata about the Service, such as its name and labels.
name: hello-world-service: This field specifies the name of the Service.
spec: This section defines the desired state of the Service, including its selector, ports, and type.
selector: This field specifies a set of labels used to identify which Pods should be targeted by the Service.
app: hello-nginx: This field specifies the label selector. It targets Pods with the label app set to hello-nginx.
ports: This field specifies the list of ports that the Service exposes.
protocol: TCP: This field specifies the protocol used by the port.
port: 80: This field specifies the port number on which the Service listens. Incoming traffic on port 80 will be directed to the targetPort.
targetPort: 80: This field specifies the target port number on the Pods to which traffic will be forwarded.
type: ClusterIP: The Service type ClusterIP is one of the several types available in Kubernetes, and it’s the default type if not specified.
ClusterIP Services are commonly used for internal communication between different components of an application running within a Kubernetes cluster.
Apply the service configuration using the following command.
kubectl apply -f app-service.yaml

Step 3: Access Your Application
kubectl port-forward svc/hello-worl-service 8080:80 -n guide

Open a web browser and navigate to to http://localhost:8080. You should see the NGINX message.
If you haven’t created the Service, you can port-forward directly to the Pod.
kubectl port-forward nginx 8080:80 -n guide
Now, you can access your application by opening a web browser and navigating to http://localhost:8080.
Deleting the Objects
kubectl delete service hello-world-service -n guide
kubectl delete pod nginx -n guide
Congratulations! You’ve successfully deployed your first application on Kubernetes using a Pod. This tutorial covered the basics of Kubernetes, including key concepts and how to set up a local cluster using Minikube. Keep exploring Kubernetes to unleash its full potential in managing your containerized applications. Happy K8s!